Organize Your Knowledge
You might want to give some sort of structure to all the information snippets you collected during your task to help you stay organized and help guide the decision. This can happen when you're half way through your exploration, or after you completed your collecting phase, or even before you even start your exploration.
Unakite offers a versatile table-building tool to help you quickly build up comparison tables with the information you are collecting. This part of the documentation will walk you through all the features available for you to build your own tables.

Support for other ways to organize knowledge such as decision trees or concept maps are planned for future releases.
What's in a Comparison Table?
A Unakite table is mainly for comparison between different options against different criteria. Simply put, options are the various way that a task or problem may be solved, and criteria are characteristics of an option or potential situations where it would become useful.
A Unakite table is organized in the following way:
-
Each row header contains an option
-
Each column header contains a criterion
-
All regular table cells contain evidence describing the relations / characteristics of their corresponding option and criterion.
-
A positive rating icon (
 ) is used to denote a positive relation, such as "React.js is great in terms of having a very short loading time".
 -
A negative rating icon (
 ) is used to denote a negative relation, such as "Bubble sort is bad in terms of speed".
 -
An info icon (
 ) is used to represent supporting information.
-
Note that all the tutorials here are made in the Unakite sidebar unless specified otherwise. The Unakite Dashboard supports all the same table-building functionalities plus the ability to make and view comments to each individual table header and cell.
Put Existing Snippets into a Table Using Drag & Drop
To put the snippets you collected into the table, simply drag the desired snippet card from the snippets collection and drop it into a table cell as illustrated below.
When dragging, please use the snippet icon (
 ) on the top-left corner of a snippet card as the drag handle.
To use the snippet as a positive rating, drop it in the positive rating pane (
 ) of the cell, as shown in the left example.
To use the snippet as a negative rating, drop it in the negative rating pane (
 ) as shown in the middle example.
To use the snippet as a piece of supporting information, drop it in the info pane (
 ) as shown in the middle example.
You can also drag snippets into row headers or column headers to make them options or criteria:

While Working with The Clipper
More on how to put highlighted / boxed snippets directly into a table.
Create Snippets Directly in a Comparison Table
Sometimes, you might want to incorporate some of your own knowledge into the table that is not necessarily snipped from the web. This might be an option or criterion you've already came across, or a piece of evidence that you've already known for sure. Unakite allows you to do that as well! The next section shows how easy it is to create options, criteria, and ratings directly in the table.
Create Options and Criteria
To create an option in the table, simply add a new row using the orange (row) plus sign, and type the option name into the new row header. Similarly, to create a criterion, simply add a new columnby clicking on the blue (column) plus sign, and type the criterion name into the new column header.
Create Snippets as Evidence / Ratings
To create a new snippet and use it as a rating, simply mouse over the desired cell and click the Add a new snippet button (
 ) which appears on the top-right corner of the cell. Use the popup box to choose the desired rating type and type in the snippet content, and then click the save button to save the snippet directly into this table cell as a rating.

Check The Corresponding Snippet of a Rating
In The Sidebar
In the sidebar table, you can see the corresponding snippet of a rating by selecting (clicking on) the rating icon. This will show the corresponding snippet card in the snippet repository. Click elsewhere to deselect.
You can also see which icon goes with a snippet by selecting (clicking on) the corresponding snippet card in the snippet repository. Selected snippets will have a red boreder. Click elsewhere to deselect.
In The Unakite Dashboard
In the task detail view, you can see the corresponding snippet of a rating by mousing over the rating icon. This will show the corresponding snippet card in the popup.
Edit Cell Content
Sometimes, having text in a cell would be more useful than the ratings. For example, if one of the criteria / dimensions is "price", you might just want to put text like "$100" or "€200" in the cells below, rather than up and down icons. Unakite also supports that!
To do so, just mouse over the desired cell, click the textbox and type in any desired text. All edits are automatically saved.
Change Rating Types
There are two ways to quickly change the rating type, say, from positive to negative or info:
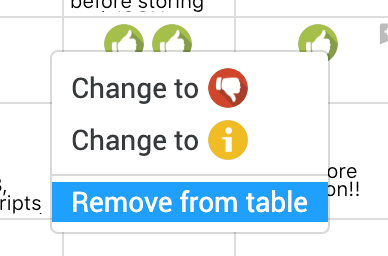
Through Context Menu
Right-click on the target rating icon and choose the new rating type from the context menu:
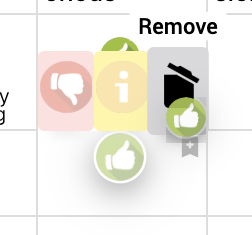
Through Drag & Drop
Drag the target rating icon and drop it into the new rating pane directly above:
Remove Snippets from a Table
If you think a snippet is no longer appropriate to be in a table, you can remove it. After removing it from the table, it'll still be in your snippet repository (in the uncategoried tab) in case you would like to re-use it later.
There are also two ways for you to remove a snippet from the table:
Through Context Menu
Through Drag & Drop
Adding Comments to Table Cells
Note: Commenting table cell can currently only be done in the Unakite task dashboard page.
You can also make comments to each individual table cell by clicking the Comments button on the bottom-right corner of a cell:
Switch Rows or Columns
Switching rows is also done via drag & drop. Simply drag the row header and drop it onto another.
Same with switching columns.
Hide / Show Rows or Columns
Let's say you have ten columns (criteria) and some of them are not of your immediate concern. You can use the hide feature to temporarily hide some of the columns.
To do this, simply mouse over the target column header and click the hide button (
 ). To un-hide a column, simply click anywhere on that column or click the show button (
 ) right above the column header.
Same with hiding / showing rows.
Delete Rows or Columns
Deleting columns can be done through clicking the delete button right above each column header. You'll be prompted with a confirmation before the actual deletion happens. After you delete a column, all the associated snippets will still be in your snippet repository (in uncategorized) in case you would like to re-use them later.
Same with deleting rows.

Mark Your Final Decision
Marking the final decision can only be done in the Unakite task dashboard page for now.
For future reference, you might want to mark which option you chose based on the table you built. This can be done by clicking the I decide to choose this option button (
 ) on the bottom-left corner of each row header. Unakite also allows you to mark more than one options as chosen.